Table of contents
Introduction 🚀
Congratulations on taking the first step towards your cloud journey! In today's tech-driven world, cloud computing has become an indispensable part of businesses and individuals alike. Think of the cloud as a magical place where you can store your data, run applications, and perform all sorts of digital wizardry. Amazon Web Services (AWS) is like your magic wand in this realm, offering a plethora of services and resources to make your cloud dreams come true. Whether you're a student or a cloud enthusiast, AWS even provides a free tier for hands-on learning, making it the ideal platform to begin your cloud adventure. So, let's embark on this enchanting journey together!

Chapter 1: Understanding AWS ☁
Imagine AWS as a gigantic digital mall where we can rent spaces and services to set up our shops or businesses. This mall spans the globe, with branches (data centers) in various cities. It's like having a store in every major city worldwide, which helps our customers to access our products quickly, no matter where they are. Whether we are selling shoes or streaming videos, AWS has a shop for it.
But here's the magical part: we can expand your shop to cover the entire mall or shrink it down to a tiny kiosk, depending on how many customers we have. This scalability, reliability, and global reach make AWS stand out in the cloud realm.
Chapter 2: Setting Up Your AWS Account 🏦
Before we can start exploring the magical mall of AWS, you need to create an AWS account. Luckily, AWS offers a free tier, which is like having a free pass to the mall for your first 12 months. To get your pass:
Visit the AWS website (aws.amazon.com).

Click on the "Complete Sign up" button.
Click on the "Create an AWS Account" button.

Follow the on-screen instructions to provide your information and set up your account.
Once we have our account, we'll receive a shiny AWS Management Console key that opens the doors to the mall. Now, we can start exploring and using AWS services like a seasoned mall-goer.
Chapter 3: AWS Identity and Access Management (IAM) 🔐
IAM - Identity and Access Management
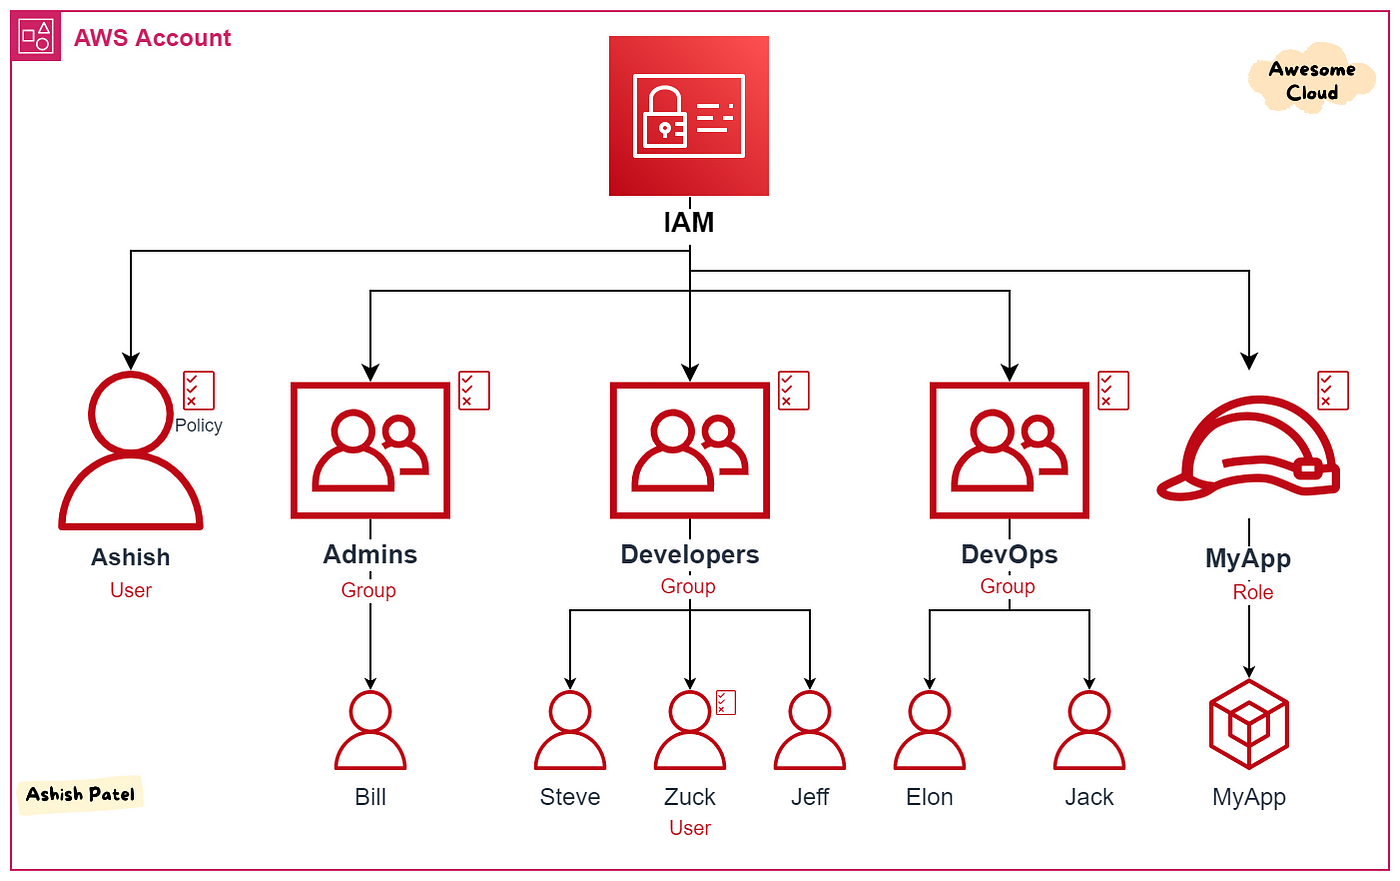
🔐 IAM, which stands for Identity and Access Management, is a crucial service provided by Amazon Web Services (AWS) that allows us to manage user identities and control their access to AWS resources. Think of IAM as the gatekeeper to our AWS kingdom. It ensures that only the right individuals or systems can access our AWS resources and that they can only perform authorized actions.

Key Components of IAM:
👤 User Identities: In AWS, a user can be a real person or an application that needs to interact with AWS services. IAM allows you to create and manage these user identities. Each user gets a unique set of credentials (username and password or access keys) to access AWS resources.
👥 Groups: Instead of managing permissions for each user individually, we can organize users into groups based on their roles or responsibilities. For example, we can have an "Admins" group, a "Developers" group, and so on. Then, we assign permissions to these groups collectively, making it easier to control access.
👑 Roles: IAM also supports roles, which are similar to users or groups but are typically used by services or applications rather than individuals. For example, we can create a role that allows an EC2 instance to access specific S3 buckets without having to store any credentials on the instance itself.
📜 Permissions and Policies: Permissions in IAM are defined using policies. Policies are like rulebooks that specify what actions are allowed or denied on which AWS resources. These policies can be attached to users, groups, or roles. AWS provides a set of predefined policies, but we can also create custom policies tailored to your needs.
🔒 Access Control Lists (ACLs): IAM enables you to set fine-grained permissions, controlling access to specific AWS services and resources. For example, we can grant a user read-only access to an S3 bucket, allowing them to view but not modify the contents.
🔑 Multi-Factor Authentication (MFA): For an added layer of security, IAM supports multi-factor authentication. Users can be required to provide a secondary authentication method, such as a time-based one-time password (TOTP) or a hardware token, in addition to their regular password.
📋 Audit Trail: IAM maintains detailed logs that record all actions taken by users and roles within your AWS account. These logs can be invaluable for security auditing and troubleshooting.
In summary, IAM is a comprehensive access management system that helps us secure our AWS resources by controlling who can access them and what actions they can perform. It allows us to set up a secure and organized structure for managing user identities and permissions within your AWS environment, contributing to the overall security and compliance of your AWS resources and applications. 🔒🌐💼
Task 1: IAM User Setup, EC2 Access, and Shell Script for Jenkins and Docker Installation
Step 1: Create an IAM User
Sign in to your AWS Management Console: Go to the AWS Console (aws.amazon.com) and sign in with your AWS account.

Access the IAM Dashboard: Navigate to the Identity and Access Management (IAM) service from the AWS Console.

Create a New IAM User:
Click on "Users" in the left navigation pane.

Click the "Add user" button.

User Details:
Enter a desired username for your IAM user.

Click "Next: Permissions."
Attach Permissions:
In the "Set permissions" step, click "Attach policies directly" to attach policies.
Search for and select the policy named "AmazonEC2FullAccess." This policy grants full access to EC2 resources.
Click "Next: Tags" (you can skip adding tags for this example).

Click "Next: Review."
Review:
Review the user's details and attached policies.

Click "Create user."
Success:
You'll see a confirmation that the user has been created.

IMPORTANT: Download the CSV file that contains the access key ID and secret access key. You'll need these credentials to configure your AWS CLI.
Step 2: Launch a Linux EC2 Instance
Now that we have an IAM user with EC2 access, you can use the AWS Management Console to launch an EC2 instance:
Sign in to the AWS Management Console if you're not already logged in.


Go to the EC2 dashboard.
Click the "Launch Instance" button to start the EC2 instance creation process.
Follow the EC2 instance creation wizard, specifying instance details, adding storage, configuring security groups (ensure that SSH access is allowed for connecting to your instance), and finally, reviewing and launching the instance.

Step 3: Install Jenkins and Docker with a Shell Script
Once your EC2 instance is up and running, you can SSH into it and execute a shell script to install Jenkins and Docker.
Here's a sample shell script (install-jenkins-docker.sh) that you can use:
#!/bin/bash

# Update the system
sudo apt update -y

# Install Java
sudo apt install openjdk-17-jre

# Install Jenkins
curl -fsSL https://pkg.jenkins.io/debian-stable/jenkins.io-2023.key | sudo tee \
  /usr/share/keyrings/jenkins-keyring.asc > /dev/null
echo deb [signed-by=/usr/share/keyrings/jenkins-keyring.asc] \
  https://pkg.jenkins.io/debian-stable binary/ | sudo tee \
  /etc/apt/sources.list.d/jenkins.list > /dev/null
sudo apt-get update
sudo apt-get install jenkins

# Start Jenkins
sudo systemctl start jenkins
sudo systemctl enable jenkins

# Install Docker
sudo apt install docker.io -y
sudo service docker start
sudo usermod -aG docker
SSH into your EC2 instance using the key pair you specified when launching it.

Create one
install-jenkins-docker.shscript on your instance usingvimornanoany method you prefer.


Run the script:
chmod +x install-jenkins-docker.sh
./install-jenkins-docker.sh


This script will update the system, install Jenkins, install Docker, and configure them to start on boot.

Once the script completes, Jenkins and Docker should be installed and running on your EC2 instance. You can access Jenkins via the EC2 instance's public IP address on port 8080 (http://YOUR_EC2_PUBLIC_IP:8080) and configure it as needed.
Task 2: Building the DevOps Avengers Team and IAM User Management
Creating a DevOps team of "Avengers" involves setting up IAM (Identity and Access Management) users, creating a DevOps group, and assigning IAM policies to the group. Below are the steps to accomplish this task using AWS as an example:
Step 1: Create IAM Users
Sign in to your AWS Management Console.
Go to the IAM dashboard.
Click on "Users" from the left-hand navigation pane.
Click "Add user."
( Repeat the previously mentioned steps exactly as described. )
Enter a username for the first Avengers DevOps team member (e.g., avenger1).
Set a custom password or let AWS generate one for you. Make sure to save or securely share this password with the user.
Optionally, you can force the user to reset their password on their first login.
Click "Next: Permissions."

Step 2: Create an IAM Group
Click "Add group."
Enter a name for the group, like "DevOpsAvengers."
Step 3: Assign Permissions to the Group
In the "Attach permissions policies" section, search for the policies you want to assign to the DevOps team. You may need to create custom policies specific to your DevOps requirements.

Select the desired policies. For a typical DevOps team, policies related to EC2, S3, RDS, CodeDeploy, CodePipeline, and other relevant services should be considered.
Review the group settings and policies, and click "Create group."
Step 4: Add IAM Users to the DevOps Group
After creating the "DevOpsAvengers" group, you'll be prompted to add users to the group. Select the IAM users we created earlier (e.g., avenger1), and click "Add users to group."


Step 5: Repeat for Other Avengers
Repeat Steps 1-4 for the other two Avengers DevOps team members (e.g., avenger2 and avenger3), assigning them to the same "DevOpsAvengers" group.

Step 6: Verify Access
Ensure that each of the Avengers DevOps team members can sign in to the AWS Management Console using their IAM user credentials and have the necessary permissions to perform DevOps-related tasks based on the assigned IAM policies.
With these steps, you've created a DevOps team of "Avengers," consisting of three IAM users who are members of the "DevOpsAvengers" group with appropriate IAM policies. Please adjust the policies and permissions according to your specific DevOps requirements and cloud platform if you're not using AWS.

Congrats on your journey so far! 🎉 Don't let excuses hold you back. 🚀 Start with AWS Cloud☁️ and explore its potential. Create IAM users, set up instances, and assemble your DevOps "Avengers" team. 🛠️ Exciting times ahead! 😃
