🚀📅 Day 35 DevOps Challenge - S3 Programmatic Access with AWS CLI 💻 📁

Passionate software engineering student | DevOps enthusiast | Seeking innovation and excellence in software engineering! 👨💻
Hello there! Welcome to another exciting day in the #90DaysofDevOps Challenge. Today, we're diving into one of the most fundamental and widely used services in AWS - Amazon Simple Storage Service, or simply, Amazon S3. S3 provides a secure and scalable way to store and access data in the cloud, making it a cornerstone of modern cloud infrastructure. In this blog, we'll guide you through tasks related to S3 programmatic access using the AWS Command Line Interface (CLI). 🚀
Understanding Amazon S3 📚
Before we dive into the tasks, let's take a moment to understand what Amazon S3 is all about.
Amazon Simple Storage Service (Amazon S3) is a leading object storage service known for its exceptional scalability, data reliability, security, and performance. It caters to users of all sizes and industries, offering a versatile platform to store and safeguard any volume of data. Whether you're managing data lakes, hosting websites, supporting mobile apps, ensuring backup and recovery, archiving, running enterprise applications, handling IoT device data, or conducting big data analytics, Amazon S3 has you covered. Additionally, it provides robust management features, enabling you to fine-tune data organization and access controls to align with your specific business, organizational, and compliance requirements. 🛡️
Core Concepts of Amazon S3 📦

Buckets 🪣
In Amazon S3, data is organized into buckets. Think of buckets as containers for your data. Each bucket has a globally unique name, and you can create as many buckets as you need within your AWS account. Bucket names must be unique across all of AWS, which is important to keep in mind when naming your buckets. 🧺
Objects 📂
Inside each bucket, you store data as objects. Objects are the actual files you want to store, whether they are documents, images, videos, or any other type of data. Each object consists of the data itself, a key (a unique identifier within the bucket), and metadata (information about the object). 📄
Keys 🔑
A key is a unique identifier for an object within a bucket. It helps you locate and retrieve objects. For example, if you have an image file called "my-image.jpg" in a bucket named "my-bucket," the key for that object would be "my-image.jpg." 🗝️
Features and Benefits 🌟
Scalability 📈
Amazon S3 is highly scalable. You can store virtually unlimited amounts of data in S3 without worrying about running out of storage space. As your storage needs grow, S3 can easily accommodate them. 📊
Durability and Availability 💪
S3 is designed for high durability and availability. Data stored in S3 is redundantly stored across multiple data centers and facilities, making it highly resistant to data loss. S3 boasts an impressive durability rate of 99.999999999% (11 nines), which means your data is incredibly safe. 🛡️
Security 🔒
S3 provides robust security features to protect your data. You can control access to your buckets and objects through Access Control Lists (ACLs) and bucket policies. Additionally, you can enable server-side encryption to encrypt data at rest, ensuring that even if someone gains access to your physical storage devices, they can't read your data without the encryption keys. 🌐

Versatility 🧩
S3 is a versatile storage service. It can store all types of data, ranging from simple text files to large multimedia files. S3 also integrates seamlessly with other AWS services and third-party tools, making it a flexible solution for various use cases, including website hosting, data backup, data lakes, and more. 🎉
Versioning 🔄
You can enable versioning for your S3 buckets, which allows you to preserve, retrieve, and restore every version of every object stored in a bucket. This is invaluable for data protection and compliance requirements. 🔄
Lifecycle Policies 🗂️
S3 offers lifecycle policies that automate the management of your objects. For example, you can automatically transition objects to less expensive storage classes or delete them when they are no longer needed, helping you optimize storage costs. ♻️
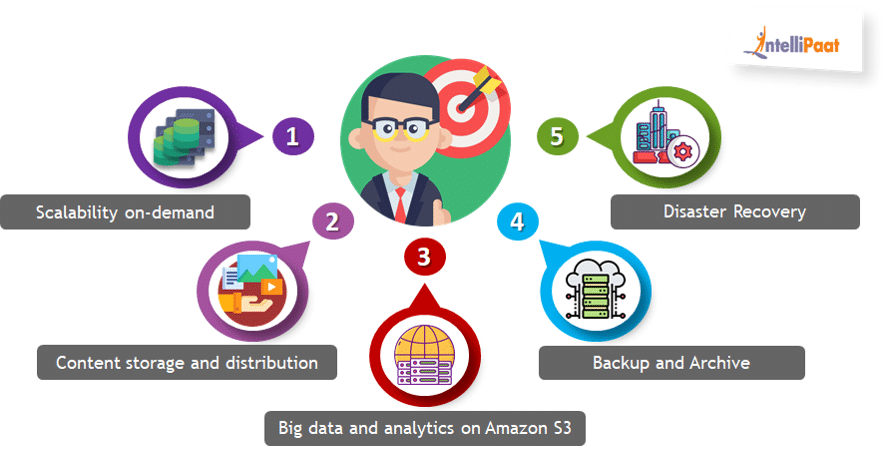
Use Cases 📊a
Amazon S3 finds applications across various industries and use cases:
Data Backup and Archiving: Organizations can use S3 to securely store and archive data, ensuring data is always available and protected.
Big Data and Analytics: S3 serves as a data lake for big data analytics platforms, making it easy to store, access, and analyze large datasets.
Website Hosting: S3 can host static websites, making it a cost-effective option for web hosting.
Content Delivery: S3 integrates with Amazon CloudFront to deliver content to users with low latency and high transfer speeds.
Application Data: Many applications use S3 as a backend storage solution for user-generated content, logs, and configuration files. 🌐
Pricing 💰
Amazon S3 offers various pricing options, including standard storage, reduced redundancy storage (RRS), and Glacier for archival storage. Pricing is based on factors such as storage volume, data transfer, and request rates. It's essential to understand S3 pricing to manage costs effectively. 💲

In conclusion, Amazon S3 is a versatile, scalable, and highly durable object storage service that plays a critical role in modern cloud computing. Whether you're running a small website or managing massive datasets, S3 provides a reliable and cost-effective solution for your data storage needs in the AWS ecosystem. Understanding S3 is essential for anyone working with AWS and cloud infrastructure. 🌥️
Amazon S3 is a key component in many AWS solutions, and mastering it is essential for any DevOps engineer or cloud enthusiast. Now, let's get started with our tasks! 📝
Task-01: Setting Up and Basic S3 Interaction 🛠️
Step 1: Launch an EC2 Instance 🚀
First, you'll need an EC2 instance to work with S3. Follow these steps:
Log in to the AWS Management Console.
Navigate to EC2.
Launch an EC2 instance (you can use Ubuntu Linux AMI).

Connect to it using Secure Shell (SSH).

Step 2: Create an S3 Bucket 🪣
Now, let's create an S3 bucket:
Go to the AWS Management Console.
Navigate to S3.

Create a new S3 bucket, choosing a unique name and your preferred region.


Leave the default settings for now.

Step 3: Upload a File to S3 📂
You have your bucket, it's time to upload a file to it:
Select your S3 bucket.

Click the "Upload" button.


Select a file from your local machine and upload it.


Step 4: Access the File Using AWS CLI 📥
Now, let's access that file from your EC2 instance using AWS CLI:
Install the AWS CLI on your EC2 instance if not already installed.


You can check your s3 bucket using
aws s3 lscommand
Configure the CLI with your AWS credentials using
aws configure.
Use the
aws s3 cpcommand to copy the file from S3 to your EC2 instance.aws s3 cp s3://source-bucket/source-path local-destination-paths3://source-bucket/source-path: This is the source path specifying the S3 bucket and the object key (path) of the file you want to copy.
local-destination-path: This is the local destination path on your EC2 instance where you want to save the copied file.

You've completed Task-01! You've launched an EC2 instance, created an S3 bucket, and accessed a file using AWS CLI. 🎉
Task-02: Snapshots and Advanced S3 Interaction 📸
IMPORTANT NOTE: 📢 When creating an EC2 snapshot, please consider the following:
Data Preservation: 📂 The snapshot captures the data on attached EBS volumes, including files and user data.
Operating System: 🖥️ The new EC2 instance will have the same operating system as the original instance. It doesn't capture the entire OS installation but retains the OS configuration and files on the root volume.
Installed Software: 📦 Some software installed on the original instance's root volume may be present on the new instance, depending on how it was installed and configured. In some cases, the AWS CLI or other software may still be available on the new instance created from a snapshot.
Variability: 🔍 However, this behavior can vary depending on the specifics of your EC2 setup, including the AMI used to create the original instance and how software was installed and configured.
In summary, while creating an EC2 instance from a snapshot typically retains the OS and some software configurations, you may still need to check and reinstall any specific software or configurations that are not included by default in the snapshot. 🚀
Step 1: Create a Snapshot 📷
Now, let's create a snapshot of your EC2 instance:
In the AWS Management Console, navigate to EC2. Select your running instance. With the instance selected, go to the "Actions" dropdown menu at the top, or right-click on the instance. From the menu, select "Create Image (AMI)."

You'll be taken to the "Create Image" page. Here, you can provide some details for the image (snapshot):
Image Name: Give your snapshot a meaningful name.
Image Description: Provide a description for the snapshot (optional).
No Reboot: By default, EC2 will attempt to stop and restart the instance during the snapshot process. If you want to skip this reboot, you can check the "No Reboot" option (only recommended for instances with EBS volumes that support this feature).

Once you've configured the details, click the "Create Image" button. You'll see a confirmation message, and the creation process begins. You can monitor the progress on the "Images" page under "AMIs" in the EC2 dashboard.


When the snapshot is complete, it will be listed as an Amazon Machine Image (AMI) in the "AMIs" section. The snapshot is also listed in the "Snapshots" section under "Elastic Block Store" in the EC2 dashboard.

Step 2: Launch a New EC2 Instance from Snapshot 🔄
Use the snapshot to launch a new EC2 instance:
In the AWS Management Console, go to EC2. Choose to launch a new instance but this time use your snapshot as the root volume.


Step 3: Download a File Using AWS CLI in new ec2 instance📥
Now, let's download a file from your S3 bucket using AWS CLI:
Configure AWS CLI on the new EC2 instance.


Use the
aws s3 cpcommand to copy the file from S3 to your new EC2 instance (Same as before).
Step 4: Verify File Consistency 🔄
Lastly, verify that the contents of the file are the same on both EC2 instances. This ensures that your data is intact during the snapshot and download process.


Congratulations! You've now completed Task-02 and learned more about snapshotting and advanced S3 interaction. 🏆
Conclusion 📝
Amazon S3 is a foundational AWS service, and knowing how to interact with it programmatically using AWS CLI is a valuable skill. With these tasks, you've taken a significant step towards mastering AWS DevOps. Keep exploring and experimenting with AWS services, and you'll be on your way to becoming a cloud ninja!
Stay tuned for more exciting challenges in the #90DaysofDevOps Challenge, and as always, happy coding! 💻🚀
References:
Note: Always remember to clean up your AWS resources to avoid unnecessary costs. 🧹


