🚀📅 Day 33 DevOps Challenge - Setting up an Application Load Balancer with AWS EC2 🚀 ☁

Passionate software engineering student | DevOps enthusiast | Seeking innovation and excellence in software engineering! 👨💻
Introduction
Welcome back to our AWS EC2 journey! In our previous blog post, we explored launch templates and instances in EC2. Today, we're going to dive into one of the most crucial concepts in EC2: Load Balancing. Load balancing is a fundamental component of large-scale and scalable computing systems that ensures the efficient distribution of workloads across multiple servers. This optimization enhances the reliability and performance of your applications. In this blog post, we'll focus on Elastic Load Balancing (ELB) and, in particular, the Application Load Balancer (ALB) provided by Amazon Web Services (AWS).
Chapter 1: What is Load Balancing?
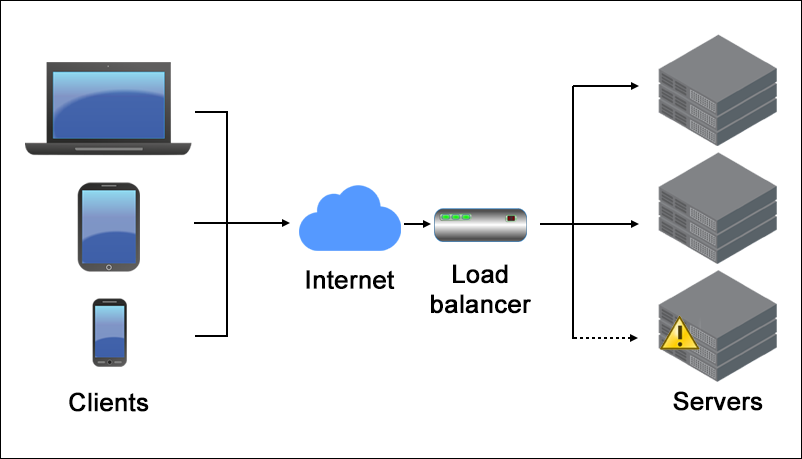
Load balancing is the process of distributing incoming network traffic across multiple servers or instances to prevent overloading any single resource. It is a critical element in achieving high availability, fault tolerance, and optimal resource utilization in your AWS infrastructure. When traffic spikes or one server becomes overwhelmed, a load balancer can redirect requests to other healthy instances, ensuring your application remains responsive and available. 🔄💼
Chapter 2: Elastic Load Balancing (ELB)
Elastic Load Balancing (ELB) is an AWS service that simplifies the process of distributing incoming traffic across multiple Amazon Elastic Compute Cloud (EC2) instances. ELB offers three main types of load balancers, each tailored to specific use cases:
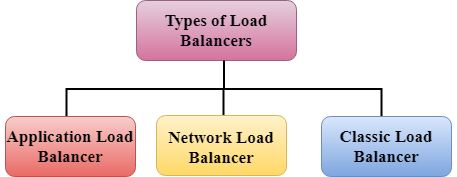
Application Load Balancer (ALB): ALB operates at layer 7 of the OSI model and is an ideal choice for applications that require advanced routing and support for microservices. This type of load balancer provides sophisticated content-based routing, enabling you to direct traffic to different EC2 instances based on the content of the HTTP request. ALB is a valuable tool for modern, complex web applications and APIs. 🌐🚀
Network Load Balancer (NLB): NLB operates at layer 4 of the OSI model and is well-suited for applications that demand high throughput and low-latency connections. It is optimized for handling TCP and UDP traffic and excels in scenarios where fast, efficient, and reliable load balancing is required. 🌐📈
Classic Load Balancer (CLB): CLB operates at layer 4 of the OSI model and is suitable for applications that need basic load-balancing capabilities. While it lacks some of the advanced features of ALB and NLB, CLB provides simple and effective load balancing for a variety of use cases. 🌐🔧
Task 1: Setting Up EC2 Instances with Apache Web Server
In this task, we will launch 2 EC2 instances with Ubuntu AMIs, install the Apache Web Server using User Data, and modify the index.html file to display your name and the message "TrainWithShubham Community is Super Awesome :)".
Launch 2 EC2 Instances:
Sign in to your AWS Management Console.

Navigate to the EC2 Dashboard.
Click on the "Launch Instance" button.

Choose an Ubuntu AMI (Amazon Machine Image) as your instance type.
Select the desired instance type and configure other settings as needed.

In the "Configure Instance Details" section, under "Advanced Details," paste the following User Data script to install Apache and modify the index.html file:

  #!/bin/bash
  apt-get update
  apt-get install -y apache2
  echo 'Your Name--SERVER_1' > /var/www/html/index.html

Follow the same steps to create a second ec2 instance and in the "Configure Instance Details" section, under "Advanced Details," paste the following User Data script to install Apache and modify the index.html file:
  #!/bin/bash
  apt-get update
  apt-get install -y apache2
  echo 'TrainWithShubham Community is Super Awesome :)--SERVER_2' > /var/www/html/index.html

Review and launch the instances.
Copy Public IP Addresses:
Once the instances are running, go to the EC2 Dashboard.

Under the "Instances" section, select your instances.
In the "Description" tab, you will find the public IP addresses of both instances. Copy them.

Testing Apache Web Server:
Open a web browser.
Paste the public IP address of the first instance into the address bar. You should see a webpage displaying your name and the message.

Repeat the same for the second instance's public IP address.

Task 2: Creating an Application Load Balancer (ALB)
In this task, we will create an Application Load Balancer (ALB) in EC2 using the AWS Management Console and add the EC2 instances from Task 1 to the ALB as target groups.
Create an Application Load Balancer:
Navigate to the EC2 Dashboard.
In the left sidebar, under "Load Balancing," select "Load Balancers."

Click on the "Create Load Balancer" button.

Choose "Application Load Balancer."

Configure the ALB settings, including name, listener configuration (usually HTTP on port 80), and availability zones.


Add EC2 Instances to the ALB:
In the ALB configuration, under the "Target Groups" section, click on "Create target group."


Configure the target group settings, specifying the protocol and port (e.g., HTTP on port 80).

Add your EC2 instances from Task 1 to the target group.


Verify ALB and Test Load Balancing:
Once the ALB is created and the target group is configured, check the health status of the target instances in the ALB.
You can do this by navigating to the "Target Groups" section in the EC2 Dashboard and selecting your target group. Check the "Targets" tab to ensure both instances are healthy.


Test the load balancing by accessing the ALB's DNS name in your web browser. The ALB will distribute traffic to your EC2 instances.
That's it! You've successfully completed both tasks. You've set up EC2 instances with Apache Web Server and created an Application Load Balancer to distribute traffic among them.
Conclusion
Load balancing is a fundamental building block for ensuring the reliability, scalability, and high availability of your AWS applications. Elastic Load Balancing, with its various types of load balancers, allows you to choose the right tool for your specific needs. 🏗️🌐
In this blog post, we've focused on setting up an Application Load Balancer (ALB) to distribute traffic intelligently and efficiently across your EC2 instances. ALB's advanced routing capabilities make it a powerful choice for modern web applications and microservices. 🚀🌐
As you continue your AWS EC2 journey, remember that load balancing is just one piece of the puzzle. Building robust and scalable architectures requires a combination of AWS services, best practices, and ongoing monitoring and optimization. So, go ahead and set up your ALB, and let it become a key player in your AWS infrastructure, ensuring your applications run smoothly and reliably in the cloud. Happy load balancing! 🚀 ☁🌟


